Back to the History of the Coupés and Convertibles


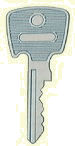
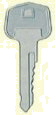
In this chapter you can find almost everything that you need to know when you sit behind the wheel of your Fintail Coupé or Convertible. If you are lucky enough to already own a one, you might find nothing new here but for the ones that aren't so lucky: this might be the only chance for you to 'sit' behind the wheel of a Fintail Coupé or Convertible.

Keys.
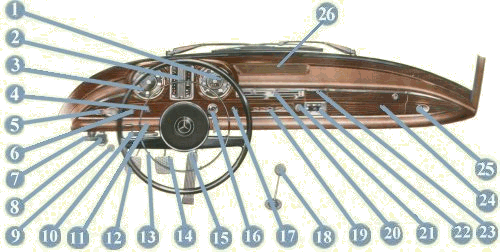
With your Fintail Coupé or Convertible you would receive three different keys (see below).

A long one for steering lock and ignition starter switch.

A short one with a square head for left and right front door and the fuel tank lock situated behind the rear numberplate.

A short one with a round head for luggage compartment and glove box (therefore luggage will always be under lock and key when the car is garaged elsewhere or in a repair shop).

The dashboard.
Sitting behind the wheel of your Coupé or Convertible, you immediately notice the large steering-wheel, a thing that the motoring-press sometimes criticized. An ivory-coloured steering-wheel was available at extra cost. Below you find a picture of a dashboard belonging to a 220SE but the general layout of this dashboard is mostly the same for all the other Coupés/Convertibles.

= Speedometer, mileage counter (see below).
= Instrument cluster (see below).
= Revolution counter (see below).
= Light switch (see below).
= Toggle switch for rear dome lamp.
= Pull switch for windshield wipers (see below).
= Tommy for engine hood lock (see below).
= Foot pump for engine hood lock.
= Foot dimmer switch.

= Handbrake lever.
= Lever for direction signal and headlights flasher (see below)
= Clutch pedal.
= Horn ring.
= Brake pedal.
= Accelerator pedal.
= Steering lock and ingintion starter switch (see below)
= Rotary switch for ventilation blower.
= Gear shift lever (see below).
= Ornamental lid (space for radio).
= Hand lever for heating and ventilation (see below).
= Electric cigarette lighter.
= Electric clock.
= Ashtray.Loudspeaker opening.
= Lockable, lighted glove compartment.
= Side window vents.
26.jpg (933 bytes) = Loudspeaker opening.


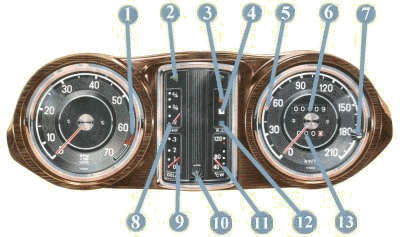
Rev. counter, Instrument cluster, Speedometer (no. 1, 2, 3).
The shape of these instruments was different from the sedan models but exactly the same for all the Fintail Coupés and Convertibles apart from the scale on the rev counter, red lined at 6000rpm on 220SE and 300SE, on 250SE and 280SE at 6300rpm. Early models would have these three instruments set in wood, later models received a leather surrounding.

= Red mark on rev counter: dangerous, don't exceed 6000 rpm.
= Pilot lamp for direction signal lights.
= Generator indicator light - red.
= Handbrake warning light - white.
= White mark on speedometer for the 50-60 km/h range.
= Total mileage counter.
= Re-set know for mileage counter.
= Fuel gauge, reserve and red warning lamp.
= Oil pressure gauge.
= Control button for instrument lighting.
= Cooling water telethermometer.
= High beam control light - blue.
= Trip recorder.

The light switch (no. 4).
A turn and pull switch.
* 0-position= Lights off.
Clockwise from 0:
* 1st stop= Parking light, tail light, identification and instrument light.
* 2st stop= In addition, high and low beam.
Pulled out:
* at 1st or 2nd stop= In addition, fog lights.
Counterclockwise from 0:
* 1st stop= Clearance lights right.
* 2nd stop= Clearance lights left.
Other consumers can be operated independent of the light switch as soon as the ignition is switched on.

Pull switch for windshield wipers (no. 6):
There are two stages:
Stage 1: slow movement of the wipers.
Stage 2: fast movement of the wipers.

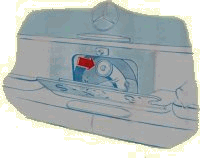
Tommy for engine hood lock (no. 7).
Open hood= Pull the lever. The engine hood which is firmly connected with the radiator grille will then open a little up to the catch on the securing hook. Take hold of the engine hood behind the ornamental molding on the left-hand side (seen in driving direction), press the plate on the locking hook upwards and lift the engine hood.
Closing hood= Press the engine hood down firmly.
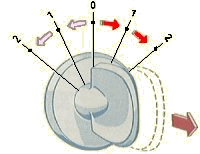
The lever for blinker direction lights and flasher (no. 11).
Early models

Turning clockwise: direction signal light, right.
Turning counterclockwise: direction signal light, left.
Returns automatically to initial position when steering wheel is in 'straight-ahead' position.
Moving up and down: passing signal light (flasher (only European design)): high beam is on as long as lever is raised.

Later models

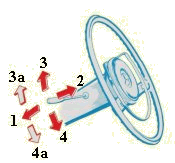
Pushing down until it engages (1): high beam.
Lifting (2): passing signal light, high beam lights up as long as lever is lifted.
Swiveling in clockwise direction (3 or 3a): direction signals, right.
Swiveling in counter-clockwise direction (4 or 4a): direction signals, left.
Steering lock with ignition and starter switch (no. 16).
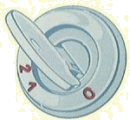
This combines ingintion switch, starter switch and steering column lock. There are 4 positions:
* 0 (Zero position)= Ingintion turned off, steering gear locked with key pulled out.
* 1 (Parking position)= Key can be pulled out, ingintion is switched off, steering gear unlocked.
* 2 (Driving position)= Key cannot be removed, ignition is switched on, steering gear unlocked.
* Starting= Turn key in clockwise direction against slight pressure up to stop. As long as the key is held against stop the starter motor will run. When released, the key returns automatically to position 2. Prior to repeating starting operation, return key at least to position 1.

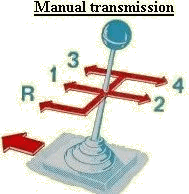
The gear shift lever (no. 18).

Standard, the gear shift lever was mounted on the floor between the front seats.

The transmission has baulked synchronish in the forward gears.
When shifting in reverse, a spring resistance must be overcome.


Early models had the automatic gear-lever mounted on the steering column. Later models had a floor mounted gear-lever. Early models have a 'O' for neutral, later cars have a 'N'.

The floor mounted gear-lever has a somewhat unusual shifting pattern: the lowest gear (2) is placed at the top while the parking (P) gear is placed at the bottom. A modern automatic transmission shifting pattern has its parking gear at the top and the lowest gear at the bottom.

The cars with automatic transmissions also had a panel, here shown below, mounted on the dashboard below the instrument cluster. Later models with a floor mounted lever did not have this panel.

Mercedes-Benz handed out a special brochure to customers on how to operate the automatic transmission. The working of the transmission is just the same as the modern ones today. Having four gears was a novelty for its time, many cars only had three gears. With the selector in position 4 or 3, the car would start in second gear. Only when the selector was put in position 2 would the first gear would be engaged. When driving away using full acceleration, the transmission would 'kick-down' and therefore first gear could be used. The driver had to push down the accelerator pedal beyond the full throttle position.

Heating and ventilation (no. 20).
Fresh air is taken in through an opening in the front of the windshield and is cleaned by a filter.
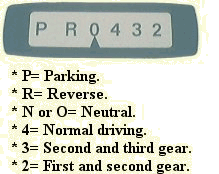
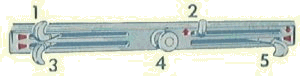
The quantity of air can be regulated by the air control lever (1) and can be also be switched off completely if offensive odors are entering.
If the quantity of air is not sufficient when you're driving slowly, the blower could be switched on in addition. A control light in the blower switch (4) lights up while this is in operation. The output of the blower can be gradually increased by turning the switch clockwise until it catches; a still greater increase can be obtained by pressing the switch beyond the catch.
With the air distribution lever (2) the required quantity of air can be distributed freely between windshield, side windows and legroom while the rear is constantly supplied with air.
The heating can be switched on freely - for left and right side seperately - by sliding the heating levers (3 and 5).

Back to the top
Previous: 8) Safety
Next: 10) Engine specifications